
Have you ever wondered how bookstagram accounts upload photos with books they don’t own yet? Or have you ever envied accounts who have mastered the spaces between caption paragraphs?
Well, fear not, my friends. I have some solutions for you.
Once again, I’m making this post for people like me, who have searched high and low for answers on how to do very specific things to no avail.
Photographing a Book When You Only Have the Digital Cover
This has been, possibly, the greatest mystery of Bookstagram for years. (At least, for me it has been.)
I’ve seen so many accounts post photos of ARCs they do not have, or photos including books which were just announced. For years, I have stared at my screen every single day, asking, “How? How are they doing that??”
One answer might be “Photoshop, of course.” But I have a better cheaper answer.
It’s an app called Photoshop Mix, and I’m going to show you how to use it.
Adobe Photoshop Mix is a free phone app for iOS and Android, but I’m using my iPhone and can’t speak for the Android app.
This will only work if you possess enough patience to succeed and learn from mistakes. (And if you’re anything like me, and you do not have much patience, you can still do this, but it will be hard.)
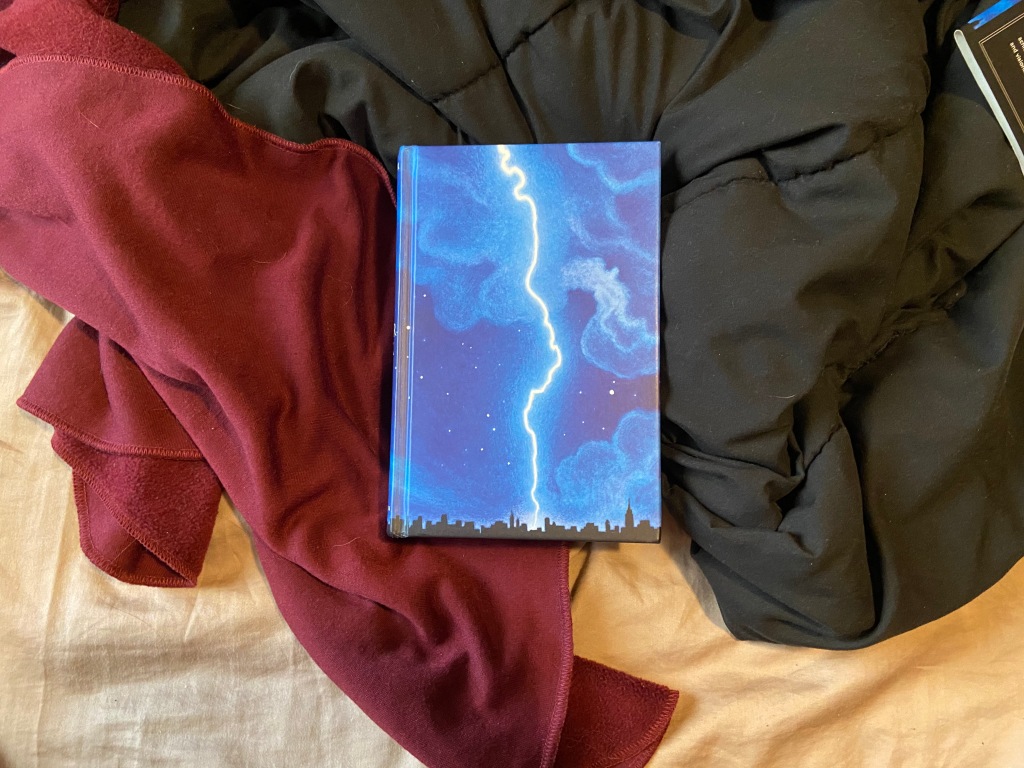
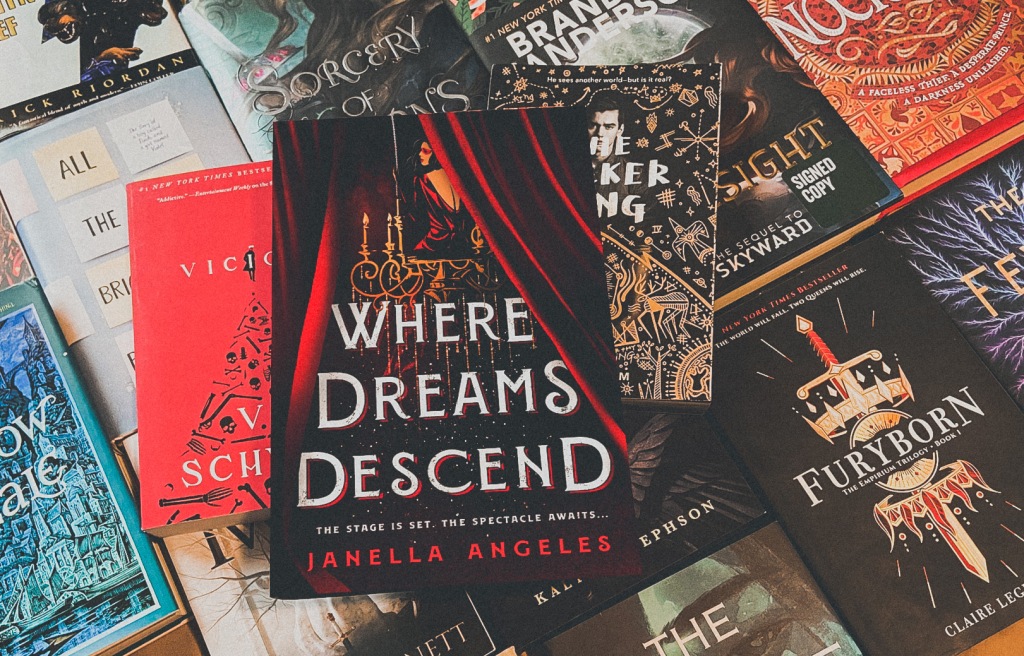
First, take a picture of a physical book you actually do own. If you do not have a book on hand, that’s okay too, but it’s just so much easier if you use a real book, and physical books will also provide you with a shadow. It can be hardback or paperback, but I suggest you use a hardback if you’re going to edit the final product to look like an ARC. Make sure the book looks as flat as possible. It can be slightly slanted, but the more slanted it is, the harder this process will be. This is called the “original image”.
(You can also take multiple photos with one of each, just for back up.)
Below is the picture I started with (in all of its messy glory).
Next, choose a book cover from Goodreads, or wherever else you want to get your cover from. If you think the book in your original image is not straight enough, you can slightly alter the book cover using the “Transform” tool in the iPhone photos editor.

Then, open the Photoshop Mix app. It will take you to the home page, where it says “My Projects” on the top. Select the “+” sign in the upper right corner. It will give you the option to select an image from your phone, so choose that button, or wherever else you have the original image.
From there, find the original image. Most likely, it will be under the “Recents” album they give you.
Once your original image is in the editor, press the little “+” sign in a circle above your original image, so you can add the book cover of your choice. Try to align the book cover image with your original image as much as possible.

You might also have to crop out some of the sides of your cover image. For this, use the Photoshop Mix tool called “Cut Out”. Use the Shape option, and select the “subtract” button on the left side, to get as close as possible to the book cover’s edges.
Most likely, you will run into an issue like the one I’m including below. There might be a bit of the book from the original image peeking out. Don’t panic! We can fix it.

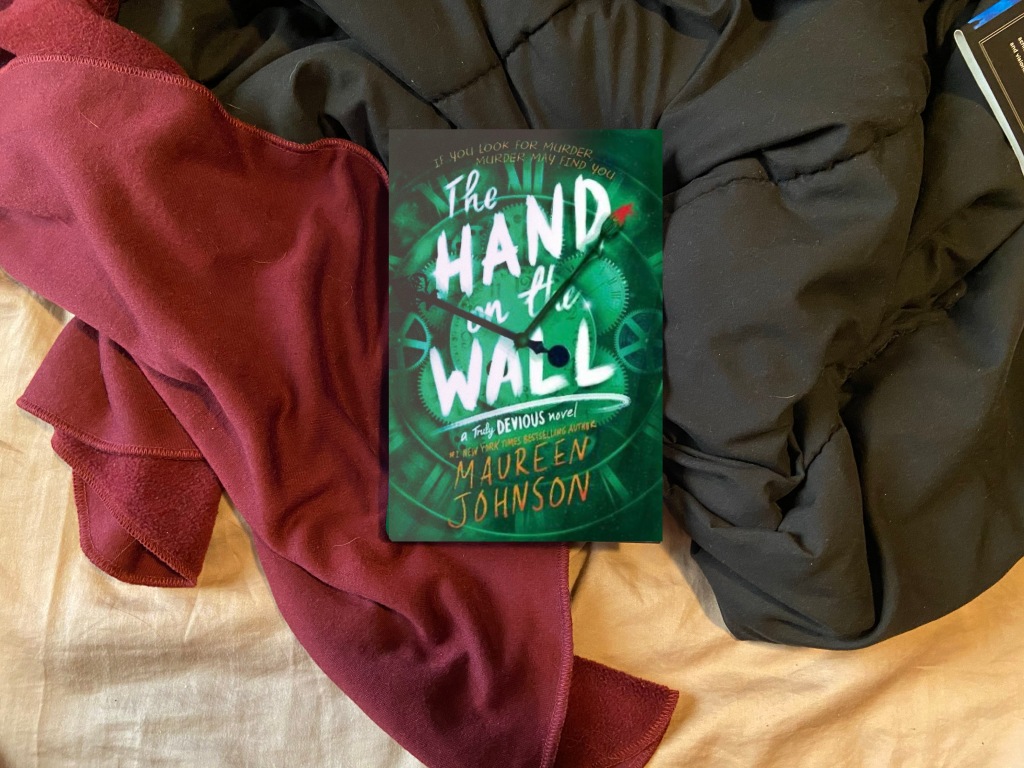
To fix this, multiply the book cover image (by pressing the image layer of the book cover, on the right side of the screen) and make the new layer smaller. Put this new layer under the first cover image, and try to line it up with the original book image that is sticking out. In my case, I’m trying to cover up the original blue cover with a smaller cover of The Hand on the Wall.
You can also use the “Cut Out” tool to round out the edges of the book cover image, so they don’t look so sharp.
The last thing you should do, (y’know, if you want,) is use the “Looks” tool to put a filter on part of your book cover image. I do this to darken one side or corner of the cover image, to make it look less like an image from the internet, and more like a book with shadows on it.
Pick a “Looks” filter which is similar to the book cover image’s original color, but darker. Then, after pressing the wand sign above the filters, swipe one side or corner of the book. Lastly, swipe the “Feature” tool to the right or left to smoothen the filter you just added.
Eventually, and hopefully, it will look like this.
After that, it’s time to go to your favorite editing app. (I’m using Photoshop Express, aka PS Express, for this demonstration.) This step is optional, but I personally think it helps to blend the book cover image in with the rest of the original image.
Add filters and edits to your liking. For my final product, I used the “Charm 3” filter on low, then added “Fade” and whitening edits. I also touched up some of the image with the band-aid/blemish tool. This is what I would normally do for my other bookstagram pictures.
And that’s it! Voilà! 😊 It took me 20-30 minutes to do this one for The Hand on the Wall. Here are the before and after pictures:


Here are some other examples of edits I’ve done!


(The Sound of Stars was my first try and I personally think it’s the worst one out of all of them 😅 but that means I got better with practice!)
It’s not perfect, but I hope you can get some use out of these tips.

PIXLR E Photo Manipulation
Just so we’re clear, this method is for the online version of Pixlr, and I’m using my laptop to do this. So if you have access to a computer/laptop (or even an iPad or something similar), this method is for you!

This method is also better than my previous one because it does not require you to be the most patient person on the planet! Amazing.
First, take a photo of wherever you would like to place your book. It can be on an ereader, on a book, or on the empty air. This will be your “original image”. I suggest you use a physical book, but you can really do this however you want. I’m using the below image as my “original image”.

Then, we’re using Pixlr E, found here. Select the “LAUNCH PIXLR E” button at the bottom of the list of all the cool things you could do with the service.
Once it’s launched, go to the left where it says “OPEN IMAGE” in blue. (Do NOT press “create new”.) Then, select “Full HD” when they ask about the Pre-resize Image, and hit Apply. Now, it should look like the below photo.

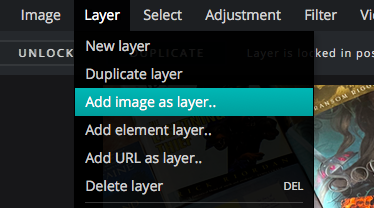
Now, download your digital cover from Goodreads or wherever else. Then go to “Layer” in the top left corner and select “Add image as layer..” to place your digital cover on top of the original image.

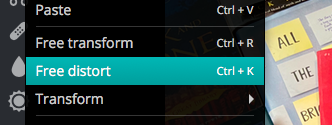
Once it’s in the photo as a layer, go to “Edit” in the top left and select “Free distort”. This will make your digital cover very easy to bend and manipulate however you like! This is the part that really makes everything SO much easier than my previous post.

After manipulating it to fit your “original image” book, it should look very much like a real book! No more pesky corners sticking out like in my first post about this!

You are now free to download your amazing work and send it to wherever you edit your photos before you post. (Downloading as a .jpeg worked best for me.) I’m still using my free Photoshop Express phone app, so I’m just going to send it to my phone and edit like I normally would, adding some warmth and fade filters. Here are the before and after results!

Wow, that was a life changer. Once again, I’m so sorry that this post is even better than the previous one. Please use this method instead if you have access to a computer in any way! It’s totally free to use Pixlr, and it was so easy to figure out. And little to no patience was required.
Here are some photos which show the difference between the two methods I’ve used! The first photo is from using the free Photoshop Mix app on my phone, and the second is using this Pixlr method.
Original image:

Photoshop Mix app vs Pixlr E:

Click on the images to get a closer look at the mistakes I made with Photoshop Mix! 
Adding Spaces Between Caption Paragraphs
This one is fairly easy, but I’m including this tip because it took me 45 minutes to find on the internet. 😅 And I don’t want you to waste your time like that!
There are a lot of people on Instagram (myself included) who have trouble with separating their caption paragraphs. It usually looks like the picture below, with emojis in place of where someone would normally like blank spaces.

Recently, I started an internship for a literary agency. My main job is to maintain their social media accounts, but I wanted the Instagram posts to look professional, without the emojis. It took me way too long to find the answer I was looking for, but I did eventually get there!
The answer is a website called Hashtagie.com, or textspacer.com. Specifically, Hashtagie’s Instagram Text Spacer.
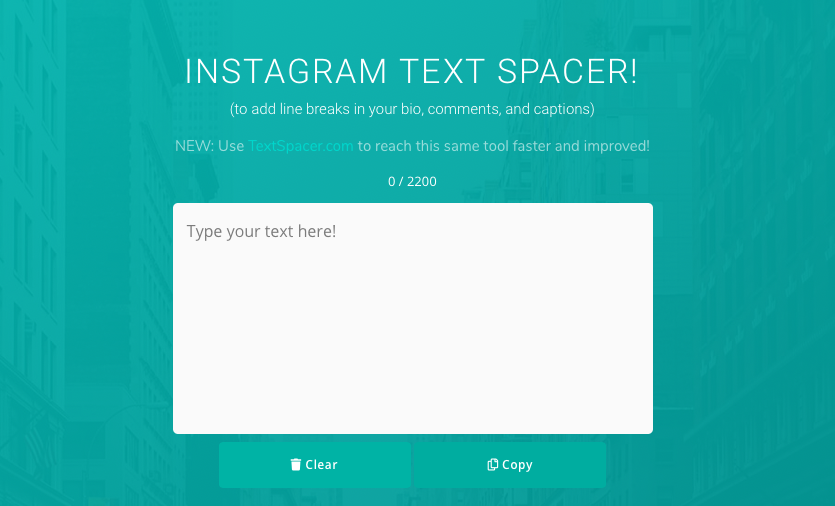
All you have to do is go to their text spacer, then type or copy and paste everything you want in your caption. Once you press the “Copy” button, your text will be sent to your clipboard, and you’ll be ready to paste your caption into your post. (I recommend doing all of this from your phone, if you typically post your instagram posts from your phone like me.)
And now, your posts will finally have spaces between paragraphs!

I hope this was useful to you! I certainly have learned a lot about Instagram, lately.

Was this post helpful? Did you know any of these Bookstagram tips? What other Bookstagram secrets do you know? Is there anything else you’d like for me to make a blog post about?
Chat with me about it!
You can also be my friend on Goodreads!
Happy reading, everyone! Have a lovely day! Please stay safe and healthy!


This is super helpful, thank you!
LikeLiked by 1 person
No problem!
LikeLike
I don’t even have Bookstagram, but this was still a really great post to read for future reference! Back in the day, I had Photoshop – my version is way too old now – so it was great to see you highlight a Photoshop-like App, I’ll definitely be checking it out 🥰
LikeLiked by 1 person
Thank you, Caro! 😊 I knew you could use Photoshop but since that’s too expensive, as soon as I found this app I knew I had to try it out! It takes some time but it’s a good option for people who mostly use phones!
LikeLiked by 1 person
Lol, I don’t have Bookstagram but I still found this super interesting to read! And the photoshopping of book covers is so awesome, and it looks so real!! That’s really amazing 💕✨
LikeLiked by 1 person
Haha, glad you liked it Rukky! And thank you, I tried my best! 😊
LikeLiked by 1 person
Thanks for the info!!
LikeLiked by 1 person
You’re welcome!
LikeLike
Oh, I knew you could do it like that but I still really, really appreciate your step-by-step. 😍
I think I will try your method on a day when I have enough patience. 😂
LikeLiked by 1 person
Thanks! Whenever I find tutorials, sometimes they don’t make it very clear, so I tried to include as many steps as possible. I hope you have enough patience to try some day, it gets easier! 😂
LikeLiked by 1 person
This is more helpful than I can tell you here!
LikeLiked by 1 person
I’m glad it was helpful!
LikeLiked by 1 person
HI! I bookmarked your blog post because this is just that brilliant.
LikeLiked by 2 people
Thank you, Colleen! 😊
LikeLiked by 1 person
You’re welcome!
LikeLike
This is soooo helpful, thank you for sharing! 😀
LikeLiked by 1 person
Thank you, I’m glad you found it helpful! 😊
LikeLike
This is BEYOND helpful, thank you so much for sharing these tips!!💜
LikeLiked by 1 person
Thanks, Kaya! 💕 Yay, I’m glad it was helpful to you!
LikeLiked by 1 person
Ooo the spacing is very helpful 👀 I use a code for it right now which works but it’s still a kind of guessing game for how many line breaks I need so this’ll make it much easier thank you! 💕
LikeLiked by 1 person
I’ve been trying to find a code for it, but they didn’t work for me! This was the easiest way, even though it took me forever to find it! 😂
LikeLiked by 1 person
Oooh, that is so helpful! I’ve been using pxlr to add images for ebooks but I never thought of using it for actual books! I’d also like to recommend IG Line Break – been using it for my captions and it’s been working amazing so far! https://apps4lifehost.com/Instagram/CaptionMaker.html
LikeLike
i don’t have bookstagram, but i’m planning on starting one (hopefully) soon, and i just bookmarked this post because it’s so helpful!! i had no idea that you could edit photos with a digital book cover just using your phone – the ones you edited look so amazing. 💖💖
LikeLiked by 1 person
this is magic lol you’re a photo editing god
LikeLiked by 1 person
🥺 thank you, Kay!
LikeLike
This was so incredibly useful! I knew about Photoshop mix but couldn’t figure out how to get it all angled right or now have the cover underneath show a bit.
LikeLiked by 1 person
Thanks, I’m glad you found it useful! It’s a bit tricky but I hope my tips can help you!
LikeLike
OMG LOOK AT YOU BEING A PRO!! I really should do this more but I’m lazy and also feel like its kinda hard to edit for my theme. I use the app a lot though for other types of edits 🙂 Have been LOVING your account Xandra xoxo
I like to use “-” to separate my captions. I used to use spaces but sometimes I’d find that it didn’t work properly and the caption would come out all funny. Then again, I did is straight from notes and not that website welp
My main tip is to also be active on stories, as well as including questions in your captions. I should actually do a whole post or something too hehe. You’re inspiring me Xandra ❤
LikeLiked by 1 person
Ahh thank you, Ruby!! 😊💕 Yeah, I understand it’s not something that can be used with every theme. I hope it was still an interesting post!
I have tried everything to space my captions, and the method in this post is the only one that works for me! 😦 All of the other tips I’ve seen literally do not work on my Instagram, for some sad reason. I’m glad you have a way to space your captions! You did not have to suffer for 45 minutes of trial and error like me 😅
Thank you!! That’s a great tip! I would love to see a whole post from you, I love your instagram account! 😊
LikeLiked by 1 person
Omg this was such a good post! I legit thought that your picture on instagram of The Hand In The Wall was of the paperback of the book itself 😮
LikeLiked by 1 person
Thank you, Prutha! That’s such a nice compliment! 😊
LikeLiked by 1 person
This is so interesting!
That said, I guess I purposely don’t *get* the photos of books people don’t actually have. I can see that people are saying they’re excited about the book or are trying to promote it, but something still seems slightly odd to me about “photographing” something you don’t have? Maybe I just don’t get Bookstagram. 😛
LikeLiked by 1 person
Thank you! I see what you mean – it’s a bit strange to think about accounts who only post about books they don’t have, using similar Photoshop methods. For me, I think this method is mostly useful for eARCs and reviews of audiobooks/ebooks. Whenever I get eARCs, I always feel like I have to do everything I can to promote my review, and since I don’t have any other devices to show the ARC cover on, this is the easiest way for me to promote the ARC on Instagram!
LikeLike
Yeah, I like the idea for ebooks! I usually upload a picture of the cover onto my Kindle screen, but sometimes the lighting ends up weird with the screen in the picture.
LikeLike
Aaah this is such a helpful post Xandra! The way I worked around the instagram caption was to make sure there weren’t any spaces at the ends of sentences and to just place . in place of emojis. Though I may end up using one of the websites instead because captions stress me out, I just want them to look nice ya know xD
LikeLiked by 1 person
Thank you, Clo! 😊 I tried that space trick, but it didn’t work for me! The website method I mentioned in the post is the only way I can get the caption spaces for some reason! I’m glad this is another way you can do it!
LikeLiked by 1 person
I don’t do bookstagram, but the paragraph spacing tips is really helpful!
LikeLiked by 1 person
Thanks, Tasya! Glad it was helpful!
LikeLike
Ahh what an amazing tutorial! Thank you for exposing bookstagram secrets for us 😉
LikeLiked by 2 people
Thank you, Charis! I’m glad you enjoyed the post! 😊
LikeLiked by 1 person